Toolbox
Wide-blade screwdriver
Torx set
Philips screwdrivers
1/ 4-inch ratchet
Metric and standard sockets
Metric and standard wrenches
Connector crimper
Test light
Drill and bits
Straight edge
Jigsaw
Small C-clamps
Duct tape
Utility knife
Plastic ties
Penetrating fluid
White lithium grease
Pencil or pen
Power windows are much more than a status symbol for truckers. They are also defense mechanisms that can quickly seal off a cab to unwanted outsiders, such as insects, ambitious lumpers or parking lot Rolex salesmen. Call it push-button pest control.
Most heavy trucks nowadays are spec’ed with power windows, made by ArvinMeritor or Sprague. However, there are still enough miserly fleets around to keep at least one manufacturer building these products for the aftermarket. Electric-Life, based in Chicago, offers kits for Freightliner, Peterbilt and Kenworth.
Mitch Sremac, Electric-Life’s president, says Class 8 business, while steady, is just a small part of his production.
“We’re an OEM vendor for Mercedes truck, Volvo autos, Ferrari, Lamborghini and Maserati,” he says. The 20-year-old company, started in Europe, also caters to hobbyists restoring classic vehicles. “We make window kits for almost any light truck from 1940 to today” – about 500 models in all. He says Electric-Life would add more heavy truck kits if it had a demand for them.
Sremac says there are a few universal kits on the market, but those units tend to be more difficult to install, involving multiple bushings and brackets.
“With universal kits,” he says, “you retain the old mechanical regulator and put the drive assembly over the crank stub. So what you’re doing is motorizing the manual system. They work OK, but they’re not very pretty.”
He says Electric-Life builds its kits to the intended doors’ exact dimensions, using die cast tooling to ensure a precise fit. “All of our aftermarket kits are made on the same lines that produce our OEM products,” he says.
An Electric-Life kit includes all the parts and supplies needed to power two windows. It sells for $399. The directions below apply to a Freightliner door kit. Shop time is about six hours.
The job
- Lay out contents. Separate parts by category: regulator and frame, wiring, switches, and mounting hardware. This will save time when you’re in the thick of installation.
- Remove door panels. Remove window crank handles, then gently, but firmly, pry off the upholstery panels with a wide-blade screwdriver or a small, thin pry bar. These are attached with plastic “Christmas tree” plugs and, sometimes, metal screws. Once the panels are off, spray a small amount of penetrating fluid on the screws fastening the metal covers to the doorframes. It might be necessary to tap the lower screws with a ball peen hammer to help break them free.
Slide the unattached cover to the left or right to disengage the regulator arm from the window channel. Repeat the process on the other door. Unbolt the regulator from each door panel.
- Mount new regulators. Electric-Life’s regulator frames are designed to use existing bolt holes, but some doors will require drilling to widen or open these otherwise blank mounting points. In punching out the holes, be careful to avoid drilling into the window.
Connect the appropriate (black and blue) wires to each regulator motor.
Prop up the window with a screwdriver or thin strip of wood. Duct tape also works, draped over the top of the door and stuck to both sides of the glass. Slide the new regulator arm into the window channel and position the frame in its mounting location inside the door shell. Run the bolts through their intended holes to make sure they’re long enough. Because of slight variations in doors, you might need to replace some of the hardware. Note that these pieces are metric in size and thread.
Repeat the process on the other door and tighten all the bolts.
- Route wires. Uncover the truck’s main circuit breaker panel, which is often at the base of the dash, just ahead of the shift stick. Find a hot terminal capable of handling a 20-amp load. Circuit breakers are usually labeled, but if you have questions, consult a schematic or a knowledgeable mechanic. Electric-Life recommends that the power come from a terminal activated by the ignition switch. Do not connect to the hot lead yet.
Disassemble enough of the dash to route the wiring harness from the chosen circuit breaker to both doors. Remove the kick panels under the far ends of the dash. Find (or drill) a small hole that will accommodate four wires.
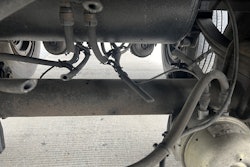
Drill a small hole in the door channel that will lead to the space behind the kick panel. Drill another hole in the door channel that will lead to the door’s interior. The second hole should be 10 or 12 inches above the first. Trucks that have heated mirrors will already have these holes – and wiring running through them. Wires inside the door channel should have little slack. Insert rubber grommets in any hole you drill.
String the wires from the circuit breaker through the dash and door channels, using plenty of plastic ties to secure them. Find an acceptable path for the regulator wires – they’ll need to connect to the window switch – and bond them to the inside of the door shell with duct tape. This will keep them from flopping around or getting snagged in internal mechanisms.
- Position switches. The kit switches require square holes to be cut in the metal door covers and outer upholstery panels to accommodate protruding connection blocks. It is possible, however, to order switches with flat backsides, eliminating the need for door surgery. All switches should be mounted over the holes formerly occupied by the manual regulator posts. Never cut into any part of the door’s interior frame.
Place a backing plate on the front side of the upholstery panel in the location you want to mount the switch. Secure it with a few screws. Turn the panel over and put the other backing plate over the screw ends. Mark the holes and cutting area. Remove both backing plates and cut out the unwanted material with a sharp utility knife. Repeat the process on the panel. Do not drill any screw holes.
Match the upholstery panels with their mating metal door covers. Hold them together with C-clamps and use a pointed tool to mark the cutting area. Remove the unwanted material with a jigsaw.
Attach the switch bezels, anchoring them with the backing plates behind the upholstery panels.
- Assemble doors. Make sure the window tracks are clean and well lubed with white lithium grease. Hold a cover near the door and poke all the six wires through the hole where the switch is to be mounted. Secure the cover on the doorframe. Repeat the process with the upholstery panel.
Connect spade terminals to wire ends and plug them into the switch’s connection blocks according to the kit’s wiring diagram. Snap the switches into the bezels.
- Power and test. Connect the wiring harness to the chosen hot lead on the circuit breaker panel. Find an appropriate ground and secure that wire. Turn on the ignition and spool both windows up and down several times to make sure the operation is smooth and quiet.
For more info
Electric-Life — (800) 548-2168
OEM truck dealers
Have an idea for a how-to? E-mail your ideas to [email protected].