How to remove, repair, replace and rebalance your tires when they’ve been tread upon.
 A simple cage like this will absorb the deadly force created if a tire blows apart during inflation.
Truck tires are designed to combat extreme road stresses, so it’s easy to conclude that when a repair is needed, almost any repair technique will do the job. But tires are fragile in many respects. They’re poorly adapted to survive rough handling of the bead or inadequate repairs.
Failure to use the proper tools and repair techniques often means, at minimum, the waste of a casing that otherwise could be retreaded. At worst, it could mean a blowout at high speed.
Tires need to be removed from the rims using flat, smooth, spoon-like tools designed to spread out the pressure needed to pry them off so concentrated force won’t damage the cords inside the bead. You can purchase simple, unpowered tire tools at a reasonable cost.
For example, Gaither Tool Co., which was started by an owner-operator, produces inexpensive tools that safely de-mount and mount tires.
 This device, used to gently work the bead off the rim, is part of a kit that allows damage-free tire work.
Before doing their own tire work, owner-operators should get formal training, says Curtis Decker, manager of product development for NAFTA products at Continental. “It costs less than the cost of one tire,” he says.
Whether using tire irons or a powered tire mounting machine, says Goodyear Marketing Communications Manager Tim Miller, use the proper amount of a non-petroleum lubricant. “Too little lube can result in the beads being damaged and the tire bead not slipping completely up on the flange of the wheel,” he says. “Too much lube can create moisture inside the mounted tire that can lead to excessive inflation pressure buildup.” Tires not slipping all the way up the flange can leak or be poorly balanced. Fluids left in the tire will evaporate from heat, raising pressure abnormally.

Before setting up your own tire shop, consider viewing videos at michelintruck.com, which explain good mounting practices, says Michelin Customer Engineering Support Manager Doug Jones. “Then get a catalog from a company that sells tire mounting equipment and accessories,” he says.


Types of repairs
It is never acceptable to just plug a tire from the outside to fill a nail hole. The tire must be de-mounted and sealed inside with a patch. Otherwise the moisture in the inflation air will corrode the cords, weakening the tire and rendering the casing useless.
Proper repair requires removing the tire from the rim, says Miller. “The hole must fall within the ‘repairable’ area of the tread – between the shoulders of the tire. The repair must be made from the inside out, following procedures described by the repair material manufacturer.”
Michelin’s “Nail Hole Repair” video, among others, are good sources for this topic, says Jones. “Just installing a plug is never a good option for a nail hole or tread puncture,” he says. “The plug and patch and/or the two-piece nail-hole repair device are better options.”
Bridgestone’s series of “Real Questions, Real Answers” advertisements notes that nail hole repairs can be done only in the crown area, which is the center portion of the tread. The outer tread band, which is integral with the shoulder on either side, is not to be repaired. The repair’s diameter must not exceed
3/8-inch. It must consist of a rubber stem and a patch, sometimes combined in an integral unit. The repair must be done from inside after the tire is off the rim. Manufacturer specifics must be followed.
Bridgestone’s materials also say that section repair is required for shoulder and sidewall damage, and it can’t be done on the bead. Section repair is more complex than a patch and plug, so it’s normally done by a professional. The repair must be vulcanized, meaning the use of adhesives that produce a virtual rubber weld. Such repairs are normally marked with a distinctive triangle so roadside inspectors will know the tire’s small bulge is due to a proper repair.
Maintaining balance
The most critical thing in tire balance is “concentric mounting,” meaning the tire is centered precisely on the wheel. Once that happens, balance problems tend to be minimal. “We try to make a uniform product that does not need balancing,” says Decker. “We try to minimize the amount of maintenance required for the truck owner.”
The Tire Doctor in Bridgestone’s series of “Real Questions, Real Answers” advertisements advises: “Both the tire and wheel must be clean and properly lubricated. Otherwise, the tire bead can get stuck in the wrong position on the rim flange before it is fully and concentrically seated. Improper mounting procedures, including poor cleaning and inadequate lubrication, are the most important factors.” Off-balance tires can lead to severe irregular wear. A bent axle or wheel can even result from a tire crooked on the rim, in addition to rapid wear.
When should you check balance? If you have a ride complaint, says Jones. “Before removing the tire and wheel assembly, check for radial and lateral run-out by determining if the tire is concentrically mounted. Bent wheels, improper mounting or flat spotting can cause excessive run-out.” Run-out refers to the outer surface of the tire moving in and out as it is rotated, which happens if it’s not concentrically mounted. “If foreign matter has clung to any tire or wheel, be careful not to contaminate the bead, and be sure to advise any personnel working with the tire to exercise due caution,” he adds. In other words, make sure the rim and wheel are completely clean so the tire bead can slide all the way onto the rim and won’t be pushed out.
Decker stresses the use of clean wheels in good condition. Dirt and other materials can build up on a tire stem. Hub-piloted wheels, he adds, may not mount concentrically to the hub when the centering tabs on the wheel are worn.
“When balanced with weights, a dynamic balance is preferred over a static balance,” says Miller. “Dynamic balancing means using a machine that spins the tire at road speed rpm and can indicate to the technician with a strobe light, or by other means, where to mount any balancing weights.”
How to de-mount and mount a tire:
Michelin’s Doug Jones recommends these tools for the job:
• A bead-breaking wedge with a handle
• A steel, rubber-cushioned tire hammer
• A wedge or bead breaker designed for the purpose
• Large tire irons with spoon ends, as well as small tire irons
• “Inflation cage” or restraining device
Used tools can develop sharp edges that will damage the delicate bead, Jones notes, so make sure the tools are in good shape.
Removal
1. Remove the wheel and release as much air pressure as you can.
 During tire work turn the wheel so the narrower of these inner bulges is facing upward.
2. Turn the wheel onto the correct side for easy removal. Inside the rim are two bulges, one narrower than the other. If the narrower section is above the other, the wheel is on its correct side, which usually means the valve stem side is downward. However, on most 19.5-inch rims, the stem should be upward.
3. Make a soap-and-water solution, or get a tire and tube mounting compound, and then thoroughly douse the bead on both sides to lubricate the beads. Jones suggests a vegetable-based lube mixed with proper water ratio according to the manufacturer’s instructions. “Never use antifreeze, silicones or petroleum-based lubricants,” he says.
4. Use a tire spoon and slide hammer or rubber-coated hammer to break the bead by gently wedging the spoon between the bead and rim at one point and then operating the slide hammer to force the two apart. Pry at additional locations if necessary.
 Lubing the bead is critical to getting it to slide on for concentric mounting and balance.
5. Use a special valve stem wrench to remove the valve stem by unscrewing it and then pulling it out.
6. Use a spoon or special prying tool like the Gaither tool shown to gently pry the bead over the rim at one point. Carefully rotate the tool around the rim to pry the rest of the bead over the top.
7. Repeat Step 6 for the bead on the other side. With regular tire spoons, use two of them to work the tire off the rim.
Replacement
1. Coat all the surfaces with tire and tube mounting compound — full strength or blended with water, per instructions.
 A slide hammer applies the force needed to separate the bead from the rim without damaging it.
2. Turn the tire to a horizontal position and work the lower bead over the upper rim of the wheel by hand. Then use the spoon to pry a small section of the upper bead over the rim. The spoon has a small tab on one side you hook under the rim for more leverage. Work the bead over the rim, a small section at a time, by prying gently with the tool.
3. Use air pressure to seat the bead against the rim on both sides. (Don’t try the dangerous and destructive method of using ether and igniting it with a match.) The most common tool is a special, small air tank with a release valve and nozzle, like those made by Cheetah or Gaither. Charge the device’s tank with air from your compressor, then position the nozzle of the device between the rim and the bead and open the valve to blast air into the tire and seat the bead.
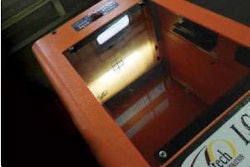
 The smooth surface and spoon shape of this device will protect the delicate bead from damage during de-mounting and mounting.
4. Install and tighten the tire valve stem. Position the tire in a safety cage and stand to one side. If the cord structure of a tire has been damaged, it often comes apart during inflation with deadly force. Inflate the tire gradually to its normal pressure, typically 105 psi. Portable cages are available and can be carried in a large toolbox.
5. If a tire has been run flat, slowly inflate it in a safety cage to 20 psi over its normal operating pressure. If you hear the cords tearing, it means they are damaged; stop inflation and stand aside. If the tire holds the high pressure, undamaged, for 20 minutes, deflate it to its normal pressure and use it.