Owner-operator Earl Evans drives traditional Kenworths, and, for him, popping in a new windshield has been an annual rite of spring.
“I do all my own windshields. I could replace two of the flat glass types on my earlier tractors in an hour. They cost me only $29.95 apiece,” says Evans, a bit of a maintenance fanatic. “I changed them every spring, after they got sand-blasted by the winter salt and other road treatments. I changed them so often because wiper blades last longer when the windshield is smooth rather than pitted. You don’t get a clean sweep with a worn windshield, either.
“Kenworth uses a two-piece locking ring on the rubber. You pry it out with a special tool. The rubber needs to be lubed to install it. But, the job’s pretty simple. I haven’t tried the curved ones on my newest tractor yet.”
Windshields run the gamut from the simple, inexpensive flat ones of the recent past to the high-tech, curved, bonded variety that have become commonplace on many of the newest tractor designs. Doug Winans, service manager at Liberty Kenworth in Chester, Pa., compares the situation of owners of older Kenworth windshields with those running with the newest designs: “Doing the bonded windshield used on the T2000, or even the bonded design introduced in the early ’90s on the T-600, is out of the question.”
International’s i-Series tractors, the Freightliner Century Class and Columbia, the Kenworth T2000 and Peterbilt 387, and year 2000 and later Western Stars with the Constellation sleeper, all use bonded windshields. Paul Hess, who helps manage the service operation at Midway Truck Service in Bethel, Pa., a Western Star dealer, says replacing bonded designs should not be attempted by anyone “unless they are very skilled in body-type work.”
Why is replacing a bonded windshield such a big deal?
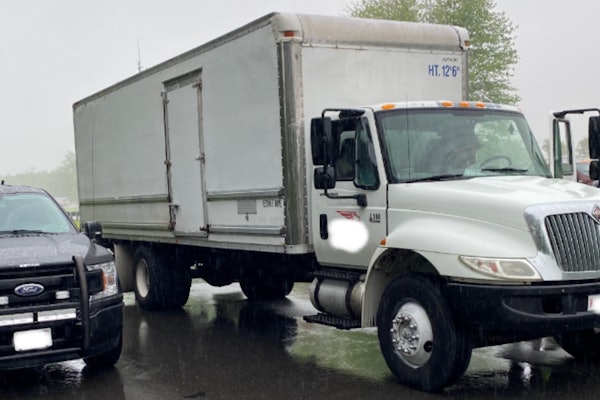
Technicians install a bonded windshield on the International i-Series.
The answer goes back to basic cab design, especially safety concerns and related weight considerations. People were coming out of cabs in frontal collisions because the windshield would pop out or be forced out when the driver or passenger collided with it. To improve safety, the windshield needed to be fastened to the cab much more strongly, and the cab structure had to be much stronger so it would survive rollovers. Yet increased weight was not an option, with maximum payload and fuel economy essential factors in a modern truck. Avoiding problems with leakage was another consideration.
The result was a cab design that took advantage of a stronger windshield mounting to make it an integral part of the cab structure. A safety glass windshield is very strong, unless it shatters. It usually doesn’t shatter unless it takes a large direct hit, or is exposed to concentrated stress. Engineers found that fastening the windshield in more snugly to keep the driver inside also helped hold the cab together. The result was optimum strength for the amount of weight.
The fastening system that holds the windshield in the tightest, and does the best job of minimizing the chance of shattering during a crash, is a continuous bead of a powerful chemical bonding agent. Such a mounting not only spreads stresses evenly, it also prevents leaks. The rub is that such a bead of sealer won’t work unless perfectly applied to perfectly prepared surfaces.
Brian Mulshine, manager of service performance at international, estimates the cost of having a bonded windshield replaced at as much as $600-$1,000. But improved fuel economy of at least 2 percent due to the design of an aero tractor with a windshield that has quite a rake will bring replacement dollars back quickly.
Many current designs, known as “roped-in” windshields, are installed using a rope to pry a rubber gasket over the edge of the glass. Depending upon the exact shape of the glass, its replacement cost, and the cab design, the competent do-it-yourself truck mechanic might want to try this work. But as Hess points out, the big worry is breakage. “If someone is doing the work for you and they break the glass, they have to pay for it. If you break it, you have to pay for it.”
Opinions on just how difficult the job is differ, depending mostly upon the shape of the
windshield. John Decker, a service engineer with Mack Trucks, Inc., says, “We don’t recommend that the average guy do this. Mack uses a wrap-around windshield that’s more difficult to replace. It’s prone to breakage during the process if not handled just right.”
Dave Wirth, service manager at Allentown Mack, estimates dealer replacement labor cost at $130, based on two man-hours at their hourly rate of $65 per hour (he says Mack dealer labor rates vary from $56-$86 in different parts of the country). The dealer’s parts department says a replacement half windshield for a Mack CH, CL, or Vision tractor would be $71.35, meaning, of course, that’d you’d pay more than $140 for the parts to replace both halves. Larry Ericson, a Midwest field service manager for Peterbilt Motors, is also cautious about recommending the do-it-yourself replacement of even roped-in Peterbilt designs. “It makes more sense to have the windshield on a 379 done at a shop because it’s easy to break it. This is a very specialized skill.”
Greg Holderfield, director of technical support services for Volvo trucks of North America says, “The job is best left to someone with experience replacing windshield glass.”
But Mulshine believes that a good do-it-yourselfer could probably replace either a flat or curved roped-in International windshield. “It’s not all that outrageous a job,” he says.
So, what does replacing a roped-in design entail? You obviously have to remove the wipers, and in some cases a cab sunshade or other aerodynamic devices that may be in the way. With the typical two-piece design, you need to first remove the divider bar that sits between them. This normally means removing capnuts and pulling inner and outer halves apart and then unbolting at the top and bottom; or, in some cases, sliding out rubber strips which lock the windshield halves in place and then removing the bar. The windshield is then gently pushed out from inside by sitting in the seat and pushing with your feet while a helper stands outside to grab it.
It helps to use large suction cups with handles designed for glass handling, especially when replacing one-piece designs. Be careful and constantly watch your step when standing on the frame and/or wheel (after cleaning the top surfaces) so you don’t fall when working outside the cab.
The Peterbilt windshield comes with the rubber gasket bonded onto its outer edge all the way around, though on others like Macks you may have to install it around the windshield’s outer edge. On the Peterbilt, for example, you need to first remove all traces of the previous sealer on the body mask flange that holds the gasket and windshield in place, and then run a 3/16-inch bead of special windshield sealant. That’s not necessary on many other designs, including Macks. On the Pete you need a 12-foot length of a 3/16-inch nylon rope, and you tie a loop in either end for use as a handle. The do-it-yourselfer works the rope into the outside gasket channel (the one that will slip over the body mask flange). He starts in the middle of the upper area and works the rope in all the way around. The gasket and rope are next lubricated with soapy water.
A helper positions the glass into the top of the mask opening and eases it into place. He then applies a constant pressure inward on the glass. The do-it-yourselfer sits inside and pulls the rope out and downward around the entire circumference, which seats the rear flange of the rubber gasket over the mask flange. Uneven areas can be smoothed out with a sharpened screwdriver or special windshield pic tool.
International conventionals immediately preceding the i-Series use a different type of rubber seal that is not installed with a rope. This seal is first installed all around over a cleaned windshield opening flange. The edges of the glass channels are then coated with soap and water to lubricate them. Each windshield half that needs replacement is worked in from the center till it slides all the way over and the outer edge is fully inserted into the seal. Then a wedge is worked in between the windshield halves to hold them tight against the right and left sides of the opening. A special weather seal tool is finally used to run all the way around the outside of the seal under the edge of the seal’s locking section to seat it.
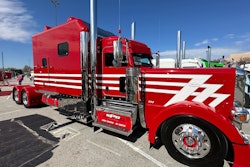
The traditional two-piece Peterbilt windshield, like this one on a Peterbilt 379, can be replaced by a do-it-yourselfer, provided he is fairly skilled and can afford the risk of breakage.
Replacing door glass
This is often the typical owner-operator type of straight mechanical repair that needs ingenuity as opposed to surgically skilled fingers. But, be aware that things can get complicated.
Holderfield summed up the perils: “There are several panels, rails, and door lock assemblies that must be removed in order to replace the door glass. It is crucial that these components are reinstalled properly for the proper fit and to reduce the risk of rattles and leaks.” Both Holderfield and Ericson said it’s a job ideally done by the experts, but the other sources felt a good do-it-yourself mechanic might want to attempt it. Hess of Midway Truck Service says door glass replacement is a do-it-yourself job in many applications, though a few are quite difficult because “you have to disassemble the whole door.” Doors with windwings, say both he and John Decker, are much more difficult than doors with a single piece of glass.
Ericson said that, on Peterbilts, the glass needs to have a rail installed onto it, and that if you did decide to attempt it, you would make things a lot easier on yourself if you bought these two parts and had the dealer assemble them for you. However, many replacement door glass assemblies include all such attaching rails or other parts pre-assembled.
International provides a lengthy tape for technicians who want to learn this procedure on the i-Series vehicles. It reveals that doing this job requires a fair amount of mechanical skill and ability with detail and observation, especially during disassembly. For example, the wiring harness inside the door has clips fastening at only a few of the many holes drilled in an inner panel. Prior to disassembly, the technician needs to mark the particular holes in use for reinstallation, or the harness won’t end up in the right position inside the door.
It’s important to know all the steps and their order before trying to do the job. For example, you may have to take out all but two of a panel’s screws, tilt it outward, and disconnect a plug or perform some other procedure before removing it completely. When installing an assembly with its mounting bolts, you may need to leave them finger tight and adjust its position before final tightening. And, because there is so much inside a door, it really helps to know just what has to be disassembled and in what order as you proceed.
So, the most important step, Hess believes, in deciding whether or not to do the job is to buy the factory manual (or get access to a factory service information Internet site) detailing every step. If you have the manual and study the procedure thoroughly, you’ll be able to decide whether or not you can handle it.
For more information, contact:
Freightliner LLC
www.freightliner.com
(503) 745-8000
Mack Trucks, Inc.
www.macktrucks.com
(610) 709-2100
International
www.navistar.com
(312) 836-2000
Volvo Trucks of North America
www.volvotruck.us.com
(336) 392-2000
Peterbilt Motors
www.peterbilt.com
(940) 591-4000
Kenworth Truck Co.
www.kenworth.com
(425) 828-5000