
“This is not a commercial system but a homemade one,” says Alkire. “Kudos to Bill Marciniac,” a close personal friend of Alkire’s and a “really good mechanic and owner-operator. It is his idea, and he furnished and drilled the blocks for me…. He has the same system on his truck.”
And not only does it keep you off the ground, says Alkire, but helps avoid tickets for excess oil and grease: “Yes, you can get a ticket for excess grease and/or oil on the truck. Stupid, I know, but with the economy as it is and towns and states misspending our money, it is to be expected.”
Alkire says Marciniac’s gotten several DOT inspector compliments on his system over the years for its cleanliness, a quality that can go a long way toward avoiding detailed inspections at the scale house. It’s “a sign that he does his best to take care of his equipment.”

Following find Gordon’s explanation of the system as well as several pictures he took and sent to me. Next step, he says: the suspension of his 48-foot dry van.
How-to: Build a closed greasing system, by Gordon Alkire

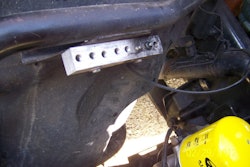
The blocks are drilled completely through and then thread-tapped to accommodate the brass fittings on the bottom and the grease Zerks on top. This allows grease to pass through unimpeded. It would not hurt to drill and tap a couple of extra holes just in case one strips out at a later time. Don’t forget to drill mounting holes in the blocks also.

I bought a 100-foot roll of quarter-inch plastic line to use on the system, a bag of quarter-inch brass compression fittings for both ends. Make sure brass fittings and Zerks are the same size and the threads match. I bought several packages of Zerk fittings. (Set up on rear shown in detail at right.)
Don’t forget to be sure to check the Zerk sizes and threads, as many look the same but are not.
You can use some of the grease fittings you take off the brake and slack adjusters and put them on the blocks instead. I prefer the 45-degree-angle ones to ease the position of the grease gun.

Once you get the length of line for each fitting measured, hook the block lines up first. Be sure to have the fittings installed on the brakes and other grease points underneath, but do not hook those lines up yet. Once you’re ready, and all lines are in place, on the block begin to apply grease one fitting at a time. When you see grease come out of the end of the line, stop. (Line to slack adjuster in rear pictured here.)

(Pictured at right: block on front passenger side setup — “So far it is the upper grease fitting on the king pins only,” Alkire says, noting that’s the one the truck-stop greasers are likely not to do.)
IMPORTANT: Be sure you leave enough line per fitting to allow for movement on the suspension system and that you allow for fastening points.
WORD OF CAUTION: Grease tends to stiffen up in cold weather, so greasing with this system in cold weather may be very difficult. Lines can come off if extreme pressure is applied. Wait until you get to a warmer climate to grease your unit.
I hope this idea helps someone else keep their truck neatly lubed and in passing condition. –Gordon Alkire